NMR Facility Basic Training
Knowledge of our standard operating procedure (SOP) outlined below and certification thereof, is required for permission to operate spectrometers in the UT NMR facility.
5th floor Survivor's Guide
Standard Operating Procedure
- Login
- Select PI at login menu, (passwords are the same for all systems)
- unix login screen is displayed?
- login as "walkup" passwd "welcome2021"
- VnmrJ (henceforth OVJ) not on screen?
- Ccheck the bottom menubar, it may be minimized
- If no instance is already running start OVJ from the desktop icon.
- OVJ login screen not showing?
- Logout last user.
- unix login screen is displayed?
- Select PI at login menu, (passwords are the same for all systems)
- >>Eject to float the sample
- Clean your sample tube
- insert in spin collar and set proper depth (40-50mm solvent height)
- Place sample tube and spin collar in the top tube of the magnet
- >>Insert to load the sample.
- >>Start >>Sample Info >>Select solvent
- Optional read default shims (click "Start" tab >> "shims" subtab >> "read default shims" button
- >>"New study" or "Continue study"
- Enter sample information (unnecessary if continuing study)
- Sample_Owner (initials or last name --all will be changed to uppercase)
- Sample_Name (notebook-page# or descriptive)
- Select experiment(s)
- Modify if desired
- Double click on the experiment name (yellow)
- Edit acquisition parameters
- "Save" to put the changes into the study queue
- Modify if desired
- >>Submit
- After completion check the spectral data
- double click on last green completed experiment
- Repeat steps 4-8 as required. Use continue study on the same sample. (Right-click on the completed experiment and select "clone" to repeat the experiment).
- >>Start tab >> Lock subtab >> uncheck Lock flag
- >>Eject Retreive your sample; if you have no more samples
- >>Insert with no sample.
- >>Logout.
Not a step just a reminder --analysis and printing are to be performed remotely using Mnova.
5th Floor full SOP
MR400 login OVJ (a first look)
The MR400's in the 5th floor lab are controlled using OpenVnmrJ (OVJ) software.

Its login screen overlays the main dashboard of the operating software. Research groups are listed in alphabetical order in the popout menu. All instruments use the same set of passwords for each group. Upon successful login, the overlay will disappear, revealing the main software dashboard.
OVJ Dashboard
The OVJ dashboard has divided into sub-sections for controlling the sample, entering sample information, adding and customizing experiments.
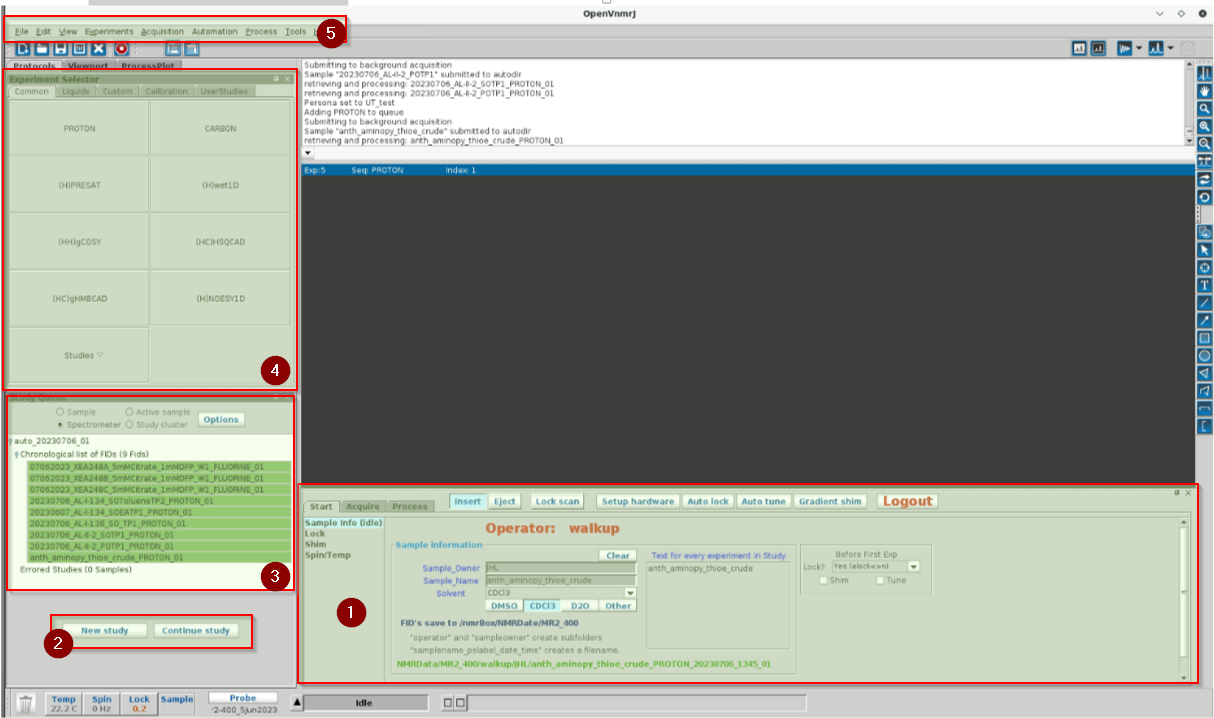
- Acquisition control panel
- defaults to "Sample Information"
- experiment customization panels are under the "Aquire" tab
- Submit button
- Daily list of previous data successfully acquired
- Experiment selection panel
- Main menu with access to more features/controls
The large black rectangle is the live data screen. It will display FID, spectrum and Lock signal. The command line above it will execute text commands (ds - display spectrum, df - display FID, aph - autophase,) The blue-ish vertical icon bar on the right controls what the cursor will do when its inside the data screen.
Operator Training Video (must watch)
Please watch the video.
UTBox-NMRData (Where's my data)
Where's my Data?
UT-IT Services provides access to cloud storage in Box.Com


Notes:
- Certified NMR users are given download permission upon completing their basic training checkout.
- FID files are organized under NMRData by Instrument_name/Group/{member-name/}Sample-name.
- If you cannot download data files, contact staff: Scott K Smith or Garret Blake
- If you cannot find a data set contact staff with the full path you were expecting. Note: All files are first saved locally and then copied/moved to UT-Box.
NMRData download permission is granted when requesting the Basic Training Checkout
NMR Data : click to access sharing link to UT-Box NMR lab account.
MNova installation (offline processing)
1) Download and install the latest version of MNova software.
Here: http://mestrelab.com/software/mnova/download
2) Setup MestreLab licenses
MNova requires three registered licenses from MestreNova that are accessed from a network drive on the UT intranet. You must create a formal path to this network location of the files and then point MNova to them. Do not save the license files to your computer!
If you are not on campus, you will need to first connect through the university's VPN service. Information on installing the VPN software and instructions on how to connect can be found at the following link here: UT-VPN Help
Create the network connection:
On Windows: Map a network drive ->
open a file browser -> Right-click Network -> select Map network drive
Type in: \\cm-srv-fs.austin.utexas.edu\nmr
Use your UT login credentials: (eid or \Austin\eid)
On MacOS: Connect to server ->
Type in: smb://cm-srv-fs.austin.utexas.edu/nmr
Use your UT login credentials: (eid or \Austin\eid)
Install the licenses:
Run MestreNova and open its license manager.
")
Open its “registration server” (the shopping cart).
")
Point to the newly mapped network drive and install each of the three licenses.
")
Make sure to close and re-open MNova before attempting to use it.

Final state with all licenses Green!
Please contact staff, if you need help installing MNova.
Reserving Time with NMRCalendar
A new version of the on-line instrument booking server, NMRCalendar, has been released. The basic framework is unchanged, but some improvements to the GUI and signup rules implementation have been made.
GUI highlights:
- The view extends to 24hrs; starting and ending at 12 midnight.
- The default view puts the current time at the top of the display.
Prime-time rules: (9am - 6pm M-F)
Booking rules have been changed to encourage after-hours usage and have been written into the Calendar's booking rules. Users can now plan for overnight, and weekend runs in advance and book time accordingly. Please be respectful of all users and start overnights after 7pm and end them by 9am the next morning. If these allotments do not meet your needs, you can always ask staff for a special time block.
Prime-Time (PT) vs not Prime-Time (NPT) Restrictions | |||||
|---|---|---|---|---|---|
| PT Length | PT Prebook | nPT Length | nPT Prebook |
Booking Approval required |
MR1/MR2 | 1 hr | 2 hr | 14 hr | 64 hr | no |
3M-500 | 2 hr | 3 hr | 14 hr | 64 hr | no |
Specialist Instruments | |||||
Ox600 | 4 hr | 2 weeks | 72 hrs | 2 weeks | yes |
Solids-400 | 4 hr | 2 weeks | 72 hrs | 2 weeks | yes |
EPR | 4 hr | 2 weeks | 24 hrs | 2 weeks | no |
Signup rules may require some adjustment to reach an equitable balance. Going forward, your feedback is valuable. The primary goal of Prime Time is to maintain a less than a 2 hour wait for access to routine proton or carbon spectroscopy, as well as discourage any one from "camping out" on a system during peak working hours. Experiments requiring extended periods should be run when not Prime-Time or approved by staff.
Specialist Instruments (Ox600, Solids400, EPR)
These instruments require manual setup and calibration for routine experiments, but they also offer a wide array of non-standard measurements. Permission to freely schedule time can be enabled for anyone who is trained on the system. If you wish access, please contact staff for more information.
Last Words
As always, these rules are in place to ensure that all users have consistent and fair access to the instruments for their work. The restrictions are not meant to discourage or prevent any projects that require longer blocks of time. Contact staff for special requests and any questions.
New User Checkout
Do: After familiarizing yourself with the information above, you will be expected to demonstrate the SOP's and acquire the proton spectrum of a sample. Final checkout is not completed until you download, process and print the sample's spectrum offline.
When you have completed these steps, click on the link below.
Basic Training (This form and others requires an active UT-O365 account to access) Certification Request